Support Report: Changing the Micro-Tubes on Your UAD-1
By Brett Patrick
 |
|
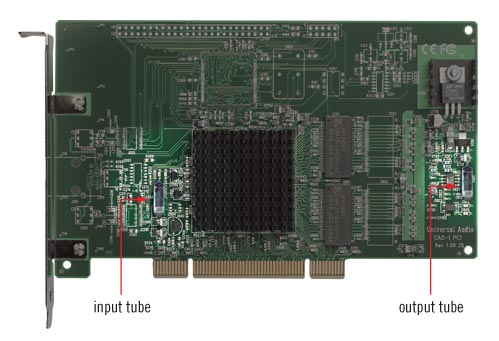
Location of UAD-1 micro-tubes
|
Checking the Micro-Tubes
To check your UAD-1 card's micro-tubes, all you will need is a digital multimeter and a microscope. While an electron microscope is recommended, this procedure can be performed using a simple 400x magnifier. The micro-tubes are mounted sideways to facilitate easy checking without first removing the tubes.
WARNING! If you do not see exposed tubes on your UAD-1, DO NOT perform the procedure! You have the FET based model.
First, be sure you are wearing a proper grounding strap. Shut down your computer. Remove the UAD-1 card, and place it on the original anti-stat bag that came with your card. UAD-1 anti stat bags have a higher grade anti-static coating than most anti-stat bags. DO NOT substitute another bag. If you cannot locate your original anti-stat bag, DO NOT perform the procedure. Call Universal Audio for a replacement.
Locate the anode and cathode of the micro-tube and measure the resistance between the two, using the access holes on the back of the tube mount. If the resistance is over 20 k-ohms, then your micro-tubes are fine. Anything under 20 k-ohms is an indication that you are not operating at optimum levels and could be losing fidelity.
Changing the Micro-Tubes
If you do get a reading of less than 20 k and decide to change the user-serviceable micro-tubes, you may order them from UA. The part number is 0401. They are extremely easy to replace: all you will need is a pair of ESD safe tweezers, an ESD safe soldering iron, an ESD safe solder suction device, and an electron microscope. Simply desolder the micro-tubes from the UAD-1's circuit board and remove them with the ESD safe tweezers, being careful to note the alignment of the anode and cathode poles. Next, align the new micro-tubes and solder them into place on the circuit board. Using your multimeter, measure the resistance to make sure you have a reading above 20k. If so, you are finished changing the micro-tubes on your UAD-1 card.
 |
|
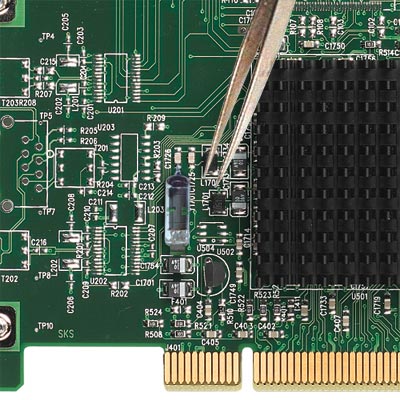
Remove the micro-tubes with ESD safe tweezers
|
Questions or comments on this article?
Disclaimer
It has come to our attention that some UAD-1 users think this article is an April Fools' hoax. It is a hoax. However, please note that an electron microscope is still necessary when changing the tubes. No Engineering Department time was used in the creation of this article.