Universal Audio WebZine
Volume 2, Number 7, August 2004
[UA Universe] [Ask the Doctors] [Digital Discourse] [Analog Obsession]
[Support Report] [The Channel] [Digi-Talk] [Analog Dialog] [Featured Promotion]
[Graphic-Rich WebZine]
[Back Issues] [UA Home]
Digi-Talk: Cambridge for TDM and 1176SE for Roland VS
 The Cambridge EQ is the long-awaited TDM EQ plug-in from Universal Audio. While it is still in beta as of this writing, it will be released in Q3, and believe me, it will be worth the wait. UAD-1 users already know how versatile, efficient, and sweet sounding this EQ is. Pro Tools LE users can use the Cambridge as an RTAS plug-in with the VST to RTAS adapter.
When UA set out to create the ultimate EQ, we didn't compromise. We wanted an EQ that was loaded with features, but still easy to use. It also had to sound and behave like a high-end analog EQ, and it had to be useful for any task, from subtle mastering tweaking to radical tone shaping.
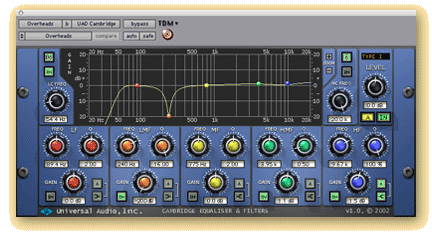
The result is the Cambridge EQ, a seven-band EQ plug-in that is unsurpassed in its quality and feature set. This EQ uses a proprietary algorithm to precisely emulate analog filters, yielding a distinctive, musical sounding EQ, and it is flexible enough to be useful on just about anything. And, UA's proprietary parameter smoothing allows for artifact-free adjustment of all the EQ's controls in real time.
Looking at the interface, you can see that each band can behave as a parametric EQ or shelving EQ. In addition to this, there are three different parametric EQ types, and three different shelf types. Let's look at the parametric EQ's in detail.
 |
|
Parametric EQ
|
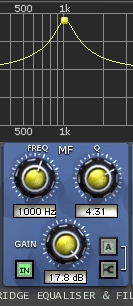
In Type II mode, the Q remains constant while attenuating, but acts differently as you boost. Similar to a API-style analog EQ, the Q value starts out rather broad, broader (lower) than the value you may have initially set for the Q. As you increase the boost, the Q gets sharper, and it's value at the point of highest boost is sharper (higher) than the initial value.
 |
|
Shelving EQ
|
It's easier to understand the Q behaviors when watching the Cambridge display, so we've made mpeg movies of the Type I, Type II, and Type III parametric EQs in action.
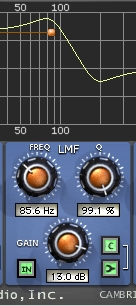
The shelving EQs also have three unique modes: A, B, and C. In each of these modes, the Q value is now measured in percent, and now affects the slope of the shelf. In 'A' mode, increasing the Q value provides a low resonant peak in the un-shelved frequency bands just before the zero axis. 'B' mode creates a high resonant peak at the top of the shelf. In C mode, high and low resonant peaks are created at both the top and bottom of the shelf.
Again, it's easier to understand the Q behavior of the shelf filters when watching the Cambridge display, so we've made an mpeg movie of it in action.
 |
|
High Cut
|
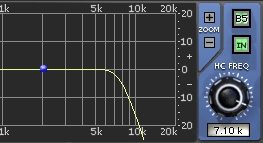
The Bessel filters have been a popular choice in digital and analog EQs, because, while they aren't incredibly sharp in terms of rejection, they have gentle phase properties. The Butterworth filters provide a good tradeoff between solid rejection and nice phase properties. Finally, the Elliptic filter provides a roll off which is very sharp. While this offers plenty of rejection, it will impart quite a bit of phase distortion. But phase distortion is not always a bad thing. When you think or radical tone shaping, think of the elliptic filter. Try a low cut elliptic filter on a bass drum, you'll see it does some very interesting stuff.
Watch the mpeg movie of the high cut filter in action to see how the filter types affect frequency response.
Graphical User Interface Options
As I said before, we wanted the Cambridge to be easy to use and a great deal of work went into the GUI. That's why we gave the user three ways to edit the parameters. You can use either the circular controls, grab the "bats" on the frequency response graph, or use text entry. Other competing EQ plug-ins on the Pro Tools platform do not provide this level of editing convenience.
One of my favorite features of the Cambridge is the Zoom feature. If you want to use the Cambridge for mastering, you'll probably be doing EQ tweaks in the range of +/- 1 to 3dB (any more than that and you might need to remix!). If you are viewing the graphic display with a scale of +/- 20dB, it is very difficult to see the EQ curve as you are using very little of the scale.
In the upper right corner of the graphic display is the Zoom buttons, and clicking the "+" button will decrease the scale from +/-20db to +/-10, and +/-5db. For mastering, I find +/- 5 dB to the most useful scale. Now those small tweaks are much easier to see.
Finally, the Cambridge offers an A and B bank, so you can save two different EQ curves in one preset. This is valuable when you have found an EQ curve you think works, but you want to try another approach, and quickly A-B them. For example, if you have a good EQ setting in bank A, you can hold the shift key down and press the bank button to switch to the B bank, and this copies the A curve into the B bank. You can now edit this EQ curve in the B bank, then quickly audition it against the original EQ curve in bank A.
To find out why the Cambridge sounds so good, visit this "Ask the Doctors" article in UA's WebZine.
-Dave Crane
 |
|
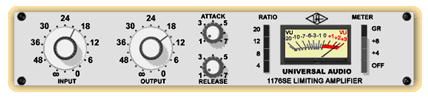
Up and coming VS 1176SE plug-in for Roland users
|
"The VS 1176SE offers users the ability to use two VS 1176SE's simultaneously on one expansion board."
In the April webzine, I wrote an article on maximizing the value of your Universal Audio plug-ins by bouncing tracks with the plug-ins inserted to new tracks, allowing you to continue using the plug-ins on additional tracks. This is an old recording trick, but as mentioned in the article, the old tricks always seem to find their uses with modern technology. Now, with the VS 1176SE, there are more possibilities than ever to get a classic sound on your mix. Let's say you have a six-track drum recording, and you want to add some of our awesome compressors to the mix. Let's start with the Kick Drum and Snare, try adding an VS LA-2A to the kick drum and an VS 1176SE to the Snare track. Balance the levels and then bounce these tracks using the methods I explained in April 2003 Digi-Talk.
Now you can go to the stereo overhead mix and insert an VS 1176LN on the stereo track, and bounce this to a new stereo track (You have to bounce after one stereo instance, because the VS 1176LN takes up the whole VS8F-3 card's CPU). You also have a high-hat track and a room ambience track, try adding an VS 1176SE on each of these. Set the controls to achieve a good balance with the rest of your drum tracks. This is, by its nature, a "seat of the pants" style of mixing, since each set of effects you bounce is semi-permanent (you still have the original unprocessed tracks, so you can go backwards and change a setting) and takes more effort to adjust than a mix in which all of the effects are "live". Still, this is a case where the quality of sound you can achieve makes this unique style of mixing worthwhile. I think if you try this method of printing the UA compression effects as you mix, you will be surprised at how good the track comes out sounding in the final product.
-Tom Freeman