Volume 2, Number 10, December 2004
[UA Universe] [Ask the Doctors] [Digital Minds] [Analog Obsession]
[Support Report] [The Channel] [Plug-In Power] [Analog Ears] [Featured Promotion]
[Graphic-Rich WebZine]
[Back Issues] [UA Home]
Plug-In Power
Using the UAD-1 in Pro Tools HD and Automatic Delay Compensation
By Dave Crane
Introduced in version 6.4 of Pro Tools, Automatic Delay Compensation (ADC) makes life easier for people using plug-ins that cause some latency, like some look-ahead gates and limiters, upsampling EQs, as well as the UAD-1 card. The UAD-1 card, as you may know, can be used in Pro Tools TDM and LE on OS X and Windows XP. The key to using the UAD-1 in Pro Tools is the VST to RTAS Adapter software made by FXpansion. Universal Audio teamed up with the British adapter specialists to create a special version of their popular VST-RTAS Adapter for the UAD-1, which converts UAD-1 plug-ins, but not VST plug-ins from other vendors. The full version of the VST to RTAS adapter, which is available from FXpansion, converts both UAD-1 and other VST plug-ins and retails for $99. Project Pak and Studio Pak owners may download a free copy of the UAD-1 VST-RTAS Adapter from their account on my.uaudio.com.
Pro Tools LE users have been using the UAD-1 in Pro Tools for some time now. One thing that LE users have had to do manually is compensate for latency. Latency occurs on a UAD-1 plug-in because the audio travels from the application to the UAD-1 card and back. But since Pro Tools HD has ADC, we don't have to be nearly as concerned with the latency caused by UAD-1 RTAS plug-ins. But that doesn't mean we don't need to be concerned at all, there are a couple things to be aware of, and I have outlined them in this article.
Setting Up the VST-RTAS Adapter
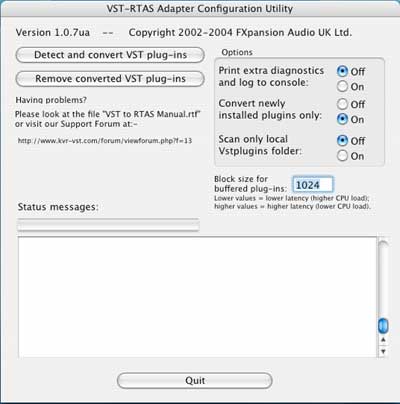
In the VstRtasConfigure application, users can set a Block buffer size at which the UAD-1 plug-ins will run (see figure1). The higher the number, the more latency you will get. The lower the number, the less latency, but the trade-off is higher host CPU load. This buffer is different than the hardware buffer size in the Pro Tools Hardware setup dialog.
While it defaults to 1024, I typically set the block buffer size down around 128, because this gives less latency. While it's harder on the computer's CPU, the CPU is not working hard at all, since all the other plug-ins are running on either the TDM bus or the UAD-1; and both options leave the host CPU for other operations.
 |
|
Figure 1: FXpansion VST-RTAS Configure screen
|
The way to determine how much latency per plug-in is multiply the block buffer size in the VST-RTAS Configure application by three (one buffer for the trip to the card, one buffer for the trip back to Pro Tools, and one buffer for the adapter). In Pro Tools, the 128 sample buffer size translates into 384 samples of delay for each plug-in. It is important to know how much latency you get per plug-in, as you will see later.
Enabling ADC in Pro Tools
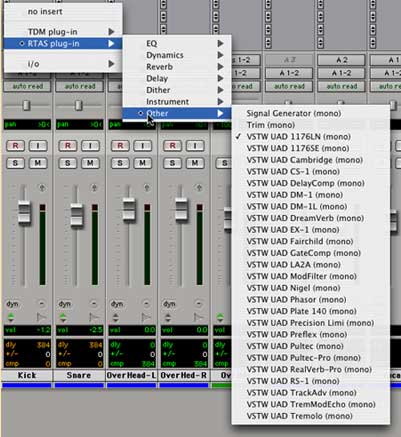
After converting the plug-ins, they will show up in the Pro Tools mixer as RTAS plug-ins, under the "Other" heading (see figure 2).
 |
|
Figure 2: UAD-1 RTAS Plug-ins in Pro Tools
|
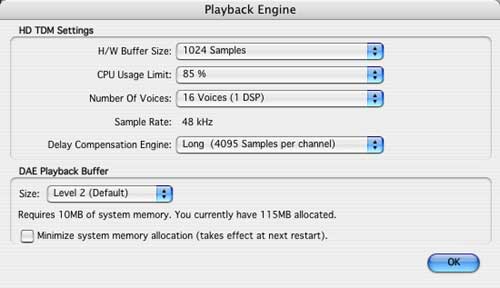
In order to start using ADC, the type of delay compensation needs to be chosen. This is done by selecting the Delay Compensation Engine type in the Playback Engine window, under the Setup menu. "Long (4095 Samples per channel)", was chosen for this example. This means we have 4095 samples per track for delay compensation. This is valuable information, as we might need it later (see figure 3). While you're there, you should bring the CPU usage limit to at least 85%.
 |
|
Figure 3: Pro Tools Playback Engine
|
Once that is set, you'll actually need to turn delay compensation on, which can be done in the Operations window (See figure 4).
 |
|
Figure 4: Turning on Delay Compensation
|
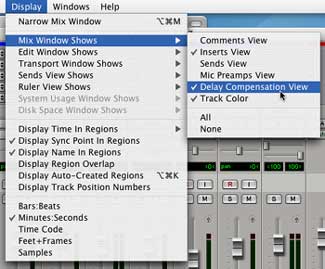
It is important to see how much delay is being compensated for; so that you know how much delay compensation you have left on each track. So, it is best to be able to view the Delay Compensation as it adjusts the tracks. To do this, go to Display/Mix Window Shows/Delay Compensation View (see figure 5).
 |
|
Figure 5: Turning on Delay Compensation View in the Mix Window
|
Understanding the Delay Values
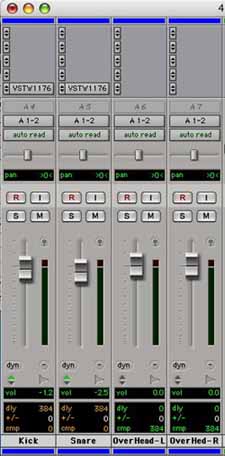
Now looking at the example below, there are four mono audio tracks, and two of them have UAD-1 RTAS plug-ins on them (see figure 5). Looking further down the mixer strip, we get to the DelayComp values.
 |
|
Figure 6: Mixer with UAD-1 RTAS plug-ins, and Delay Comp view
|
 |
|
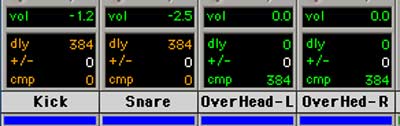
Figure 7: Close up of Delay Compensation Values
|
Looking at the bottom, we can see the Delay Compensation values. A detail of these values is available in Figure 7. The two items to look at are "dly" and "cmp". The first value, "dly" is the delay that the plug-ins are causing on the track. "Cmp" is the amount of delay compensation that Pro Tools is applying to the track. As you can see in Figure 6, there are two UAD-1 RTAS plug-ins on two tracks, and the other two tracks have no plug-ins. The plug-ins on the Kick and Snare tracks are causing 384 samples of delay, so Pro Tools' ADC is delaying, or "compensating", the two overhead tracks by 384 samples. Basically, Pro Tools looks at the tracks that have the most plug-in-induced delay, and then delays the rest of the tracks by the same amount.
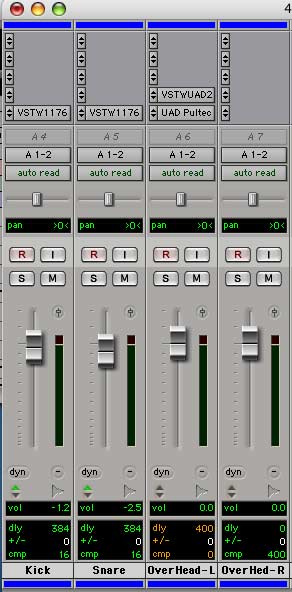
Now let's add a TDM UA Pultec Eq plug-in to one of the overhead tracks so you can see how the latency values change (see figure 8). UA's Pultec EQ has 16 samples of latency itself due to upsampling. Now the track with the Pultec is being delayed by only 368 samples, because the Pultec's delay means that Pro Tools does not need to compensate that track as much. Notice that the Overhead-R track is still delayed by 384 samples.
 |
|
Figure 8: Adding a TDM plug-in to the Mix
|
Now let's see what happens if we add a UAD-1 RTAS plug-in to the track with the Pultec. The new UAD-1 RTAS plug-in added 384 samples of delay to that track; so now that Overhead-L's delay is 400 samples (see Figure 9). Since the Kick and Snare tracks now have less delay than the Overhead-L track, those two tracks must now be delayed by 16 samples to match the delay of Overhead-L.
 |
|
Figure 9: UAD-1 RTAS and TDM plug-ins on same track
|
Pro Tools LE users have been doing this delay compensation manually using our DelayComp plug-in. The ADC in Pro Tools HD makes using the UAD-1 very easy. The only thing you need to watch out for is making sure that you don't exceed the amount of delay compensation that is available per track. The way to do that is:
- In Pro Tools, use the Long Delay compensation option, and increase the CPU usage limit.
- Convert the UAD-1 VST plug-ins at a small buffer size, like 128 (remember, the actual delay will be three times that amount!).
- Make sure you can view the delay compensation in the Mix window.
- Start mixing!